Punjabi Hindi Typing on website
Download Software
Typing in Indian Languages in Windows XP & Server 2003
Windows XP and Server 2003 support Devanagari, Gujarati, Punjabi, Kannada, Tamil, Telugu, Arabic, Urdu.
Windows XP - Service Pack 2 supports Bengali, Malayalam. Complex(Indic) text support needs to be enabled manually.
- Go to Start > Control Panel
- If you are in Category View select the icon that says Date, Time, Language and Regional Options and then select Regional and Language Options.
If you are in Classic View select the icon that says Regional and Language Options. - Click on the Languages Tab. Under Supplemental Language Support select the option Install files for Complex Script and right-to-left languages (including Thai). Refer to Fig. 5.
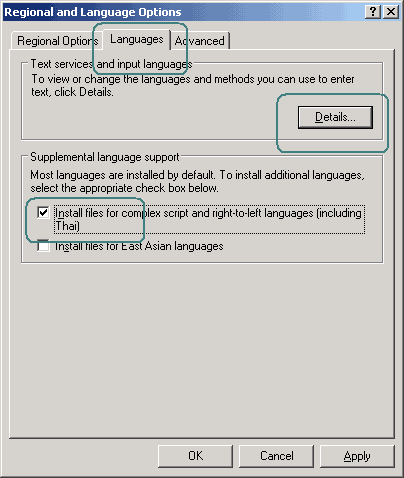
Fig. 5 - Regional and Language Options Dialog Box in Windows XP - Click Ok. The system may prompt you to copy the appropriate files from the Windows CD
- Insert the disc when prompted and proceed. Restart the computer after files have been copied.
- Select the Languages Tab. Click on Details button. Refer to Fig. 5
- Click the Add button to add a keyboard for your desired language. Refer to Fig. 6.
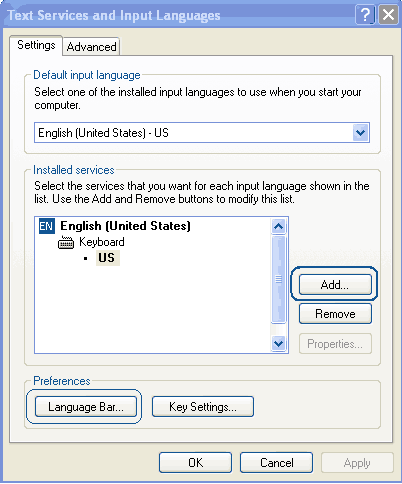
Fig. 6 - Add Languages Dialog Box in Windows XP - Select the required language. Refer to Fig. 7
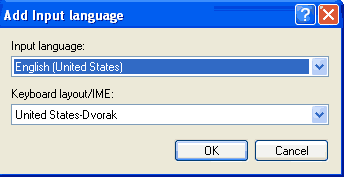
Fig. 7 - Add Language Dialog Box in Windows XP - Repeat the above steps to add other Indian languages that you require for typing.
- Click OK to save the changes and close the Regional Options panel.
- You should now see a language indicator in the System Tray (located at bottom right hand corner of the desktop by default). Refer to Fig. 8.
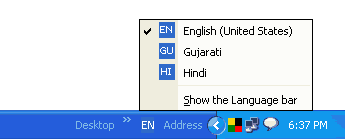
Fig. 8 - Language Bar in System Tray in Windows XP - You can switch between different languages by clicking on the language bar and changing the language or by pressing the left ALT+SHIFT keys.
Typing in Indian Languages in Windows 2000
Windows 2000 supports Devanagari, Kannada and Tamil. Complex(Indic) text support needs to be enabled manually.
- Go to Start > Settings > Control Panel > Regional Options > General Tab. Refer to Fig. 9
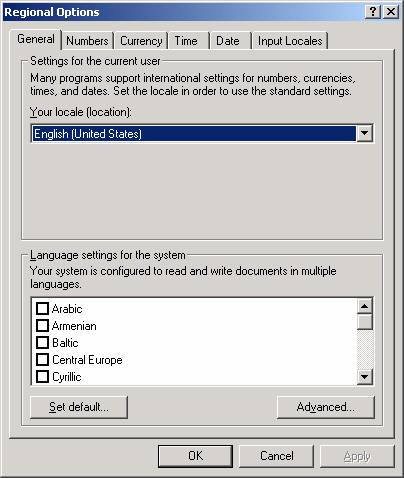
Fig. 9 - Regional Options Dialog Box in Windows 2000 - Under Language Settings, check the box next to Indic
- Click Ok. The system may prompt you to copy the appropriate files from the Windows 2000 CD
- Insert the disc when prompted and proceed. Restart the computer after files have been copied.
- If you don't have the Windows CD, you can download the files from here.
Extract its contents into a folder. When prompted for Windows CD, simply point to this folder using 'Browse' option of the prompt window.
- Select the Input Locales Tab
- This will show you the Add Input Locale Dialog Box Refer to Fig. 10
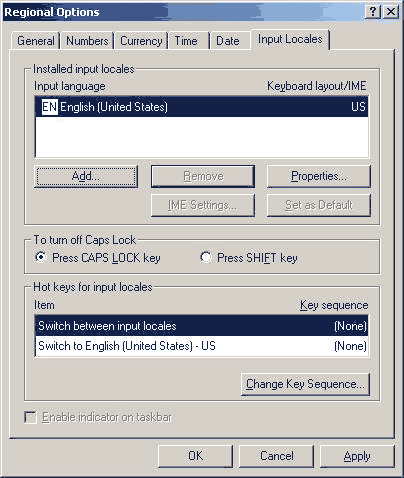
Fig. 10 - Add Input Locale Dialog Box in Windows 2000 - Click on the Add button located under Input Language Display Box.
- This will take you to Add Input Language Dialog Box Refer to Fig. 11

Fig. 11 - Add Input Language Dialog Box in Windows 2000 - Repeat the above steps to add other Indian languages that you require for typing.
- Click OK to close the Regional Options panel.
- You should now see a language indicator in the System Tray (located at bottom right hand corner of the desktop by default). Refer to Fig. 12

Fig. 12 - Language Bar in System Tray in Windows 2000 - You can switch between different languages by clicking on the language bar and changing the language or by pressing the left ALT+SHIFT keys.


